Amazon VPC allows users to launch AWS resources in a logically isolated virtual network the user has defined. It is essentially your own piece of the cloud that closely resembles a traditional network that would be operated in a data center. Some features include Virtual private clouds (VPC), Subnets, IP addressing, Routing and more.
When starting out with Amazon VPC there is a default VPC in each AWS region. This VPC comes with a public subnet in each Availability Zone, an internet gateway, and settings to enable DNS resolution. Users can immediately start launching EC2 instances into a default VPC and use services such as Elastic Load Balancing, Amazon RDS, etc. This VPC is suitable for getting started quickly and for launching public instances such as a blog or simple websites. We will create our own VPC to use.
A VPC is a virtual network dedicated to a user’s AWS account that is logically isolated from other virtual networks in the AWS cloud. Users can specify an IP address range for the VPC, add subnets, add gateways, and associate security groups. A VPC must have additional resources, such as subnets, route tables, and gateways, before users can create AWS resources in the VPC.
Create a new VPC in the VPC dashboard page. Under VPC settings click on VPC only and give it a name. Specify the IPv4 CIDR block which and optionally give the VPC an Amazon-provided IPv6 CIDR block. Tenancy will be left at default.

A subnet is a range of IP addresses in a VPC where users can launch AWS resources into subnets. Users can connect a subnet to the internet, other VPCs, and data centers. Each subnet resides entirely within one Availability Zone. By launching instances in at least two Availability Zones, users can protect your applications from the failure of a single Availability Zone. A public subnet has a direct route to an internet gateway while a private subnet does not have a direct route to an internet gateway.
Create the private and public subnets in the VPC dashboard page under Subnet. Under VPC ID, click on the VPC we just created and add new subnet. Give the subnet a name and I will place this first initial subnet in AZ us-west-1a. Give the subnet an IPv4 CIDR block and optionally an IPv6 CIDR as well.
Since my initial IPv4 CIDR block was /24, that gives me 256 subnets in total and can be split into 4 subnets equally with a /26 which gives 64 IP addresses in each subnet. My second public subnet will be in us-west-1b, and the two private subnets will follow the same pattern with one being in us-west-1a and the other subnet in us-west-1b.

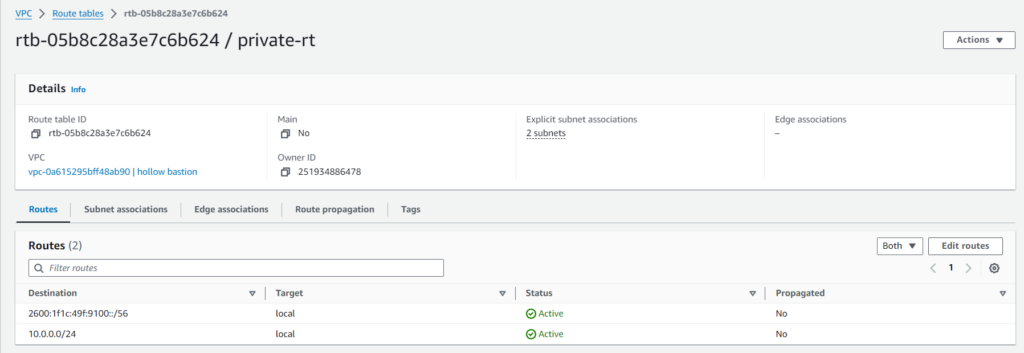
Route traffic to and from subnets using route tables. Route tables contain a set of rules, called routes, that determine where network traffic from a VPC is directed. Users can explicitly associate a subnet with a particular route table. Otherwise, the subnet is implicitly associated with the main route table. Each route in a route table specifies the range of IP addresses where a user wants the traffic to go and the gateway, network interface, or connection through which to send the traffic.
Create two route tables that the private and public subnets will use. Give the route tables a name and associate the route tables with the VPC created earlier. Once they have been created, under the actions tab, edit the subnet associations. The public subnets with the public routing table and the private subnets with the private routing table.

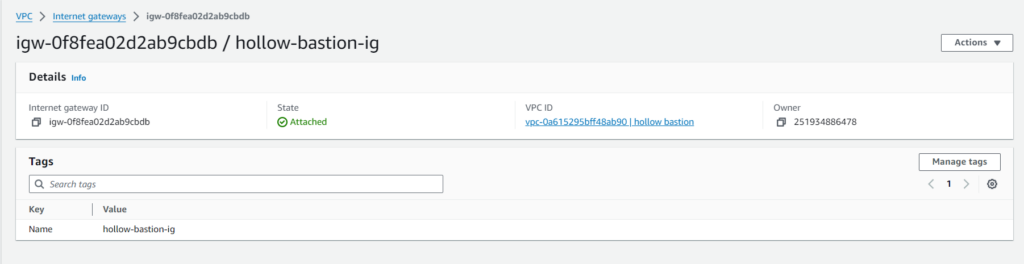
Users control how the instances that are launched in a VPC access resources outside the VPC. By default, each instance that a user launches into a nondefault subnet has a private IPv4 address, but no public IPv4 address. These instances can communicate with each other but can’t access the internet. Users can enable internet access for an instance launched into a nondefault subnet by attaching an internet gateway to its VPC (if its VPC is not a default VPC) and by associating an Elastic IP address with the instance.
Create an Internet gateway and give it a name so the VPC can connect to the internet. Under the actions tab, attach the internet gateway with the VPC.
Alternatively, to allow an instance in a VPC to initiate outbound connections to the internet but prevent unsolicited inbound connections from the internet, users can use a network address translation (NAT) device. NAT maps multiple private IPv4 addresses to a single public IPv4 address. Users can configure the NAT device with an Elastic IP address and connect it to the internet through an internet gateway. This makes it possible for an instance in a private subnet to connect to the internet through the NAT device, routing traffic from the instance to the internet gateway and any responses to the instance.
Create a NAT gateway and give it a name. Select the public subnet the NAT gateway will be created in. Connectivity type will be Public and will be assigned an Elastic IP address.

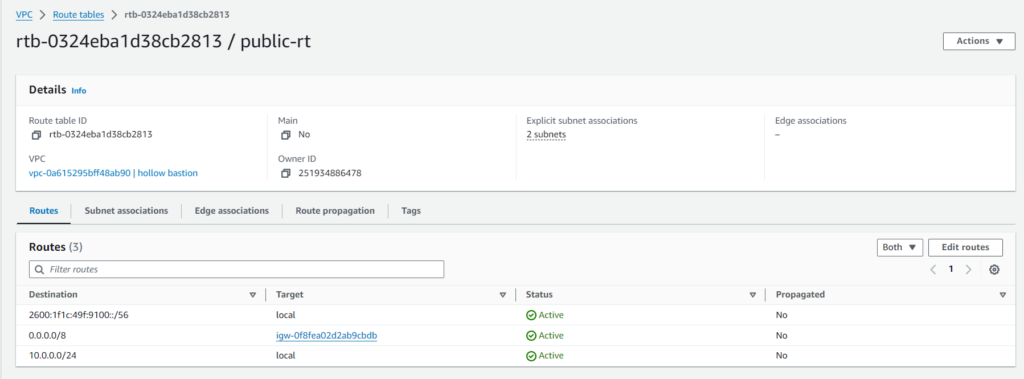
Now that the internet gateway has been associated with the VPC and the NAT gateway has been associated with a public subnet we can add the routes to the routing table. Back in the public routing table under the routes tab, add a route to a destination of anywhere 0.0.0.0/0, to target the internet gateway created.
For the private routing table add a route to destination anywhere 0.0.0.0/0, to target the NAT gateway created.

The VPC has now been created with all the components to launch resources and connect to the internet.
Leave a Reply